Thursday, July 19, 2012

We Have Moved!

We just wanted to let you know that we haven't forgotten about you!

 If you were wondering why we haven't posted recently, don't worry... You can still see all of your favorite Federal Brace How to blog posts in Tumblr


As always, thank you for reading and have a great day!!

Thursday, June 14, 2012

Retro Thursday: 1970s Kitchen


After the 1960s, kitchens began to change a bit. The oven and range became one unit instead of two separate appliances. Instead of tile countertops like before, people used Formica counters in the 1970s. The popular colors of the 1970s were also different from before. Kitchens were shaded in outdoorsy or “earthy” colors like avocado green, burnt orange, or harvest yellow. Appliances were shaded with colors like these as well. Cabinets were wood that was usually stained with a dark brown. It was also popular for cabinets not to have door handles. 
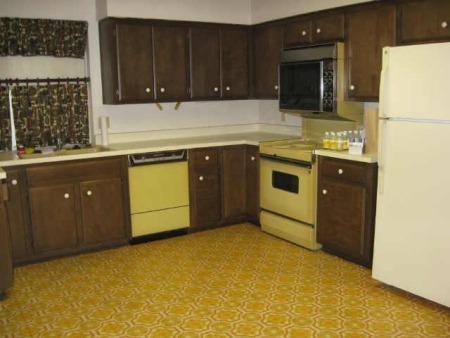
Below is a picture of a 1970s kitchen. As you can see, the cabinets are a dark brown color. The range and stove are one unit. The harvest gold color is being used in this kitchen as well. The kitchen counter is Formica. Everything is matching which was a popular feature in 1970s kitchens.
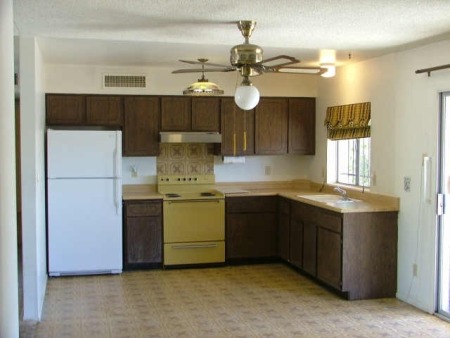
Here you can see the harvest gold color again. The laminate floor was popular in the 1970s.


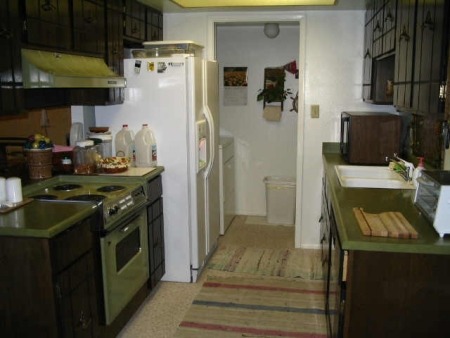
Here is an example of an avocado green kitchen. The color extends from the countertops to the oven/range and the hood. Also, the dark brown cabinet color is not only on the cabinets; check out the microwave!
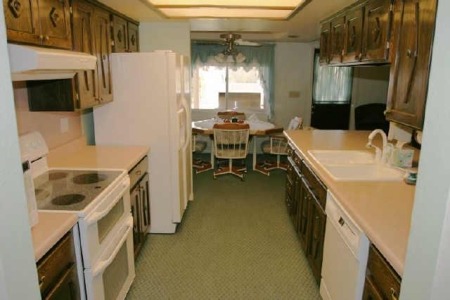
The cabinets are beginning to be a little bit lighter into the late 1970s. Check out the avocado green carpet in this kitchen!


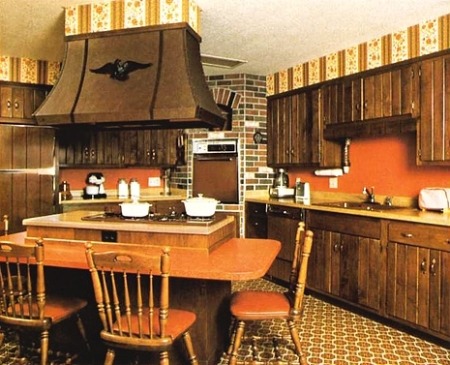
Here is an example of the red copper color used in some 1970s kitchens. This looks like a combination of a 1960s and 1970s kitchen with the brick wall and wood cabinets from the sixties and the harvest gold countertops and wall paper and patterned flooring from the seventies. 


Although the 1970s were a change from previous decades, this is the type of kitchen that a lot of this generation’s parents probably grew up in and remembers. A lot of kitchens today all have so many similarities because everyone wants to have the latest models of everything like granite countertops and stainless steel appliances. In the 1970s, people attempted to be unique and original in their kitchens and you don’t see a lot of that today.

Pictures are courtesy of uglyhousephotos.com.

Tuesday, June 12, 2012

The Cost of Kitchen Renovations


 On average, we've found that kitchen renovation costs between $15,000 and $20,000 when you don't spend on appliances. It can cost up to $45,000 with appliances. With these numbers, on average kitchen remodels cost $27000. The cost of your kitchen remodel can vary according to what region you live in, the materials used, the design you want, your budget, and the quality of appliances you buy.

According to msnbc.msn.com you should plan wisely before renovating your kitchen. They say not to the stove or the sink because it costs more to do plumbing or electrician work and you want to avoid that cost. Also, you should plan your lighting needs ahead of time so it will go along with the electrical work. Most kitchen cabinet stores will plan the layout for your kitchen for free or do measurements for a price and deduct that price if you hire them to do the installation. You can also save on buying lower quality appliances. It all depends on the look you are attempting to attain with your kitchen remodel. You should compare the price of your potential kitchen remodel with the cost of your home and see if it's worth it.


For more information on this topic, please look at the comments on this blog. You can compare your kitchen renovation cost along with the price other people have spent on their kitchen remodel and see if you are spending too much.

If you want to figure out how to budget your kitchen remodel, you can take a look at this site as well. 

Thursday, June 7, 2012

Take a LoOk Into 1960s Kitchens!

The 1960s were a time of many changes including the assassination of John and Robert Kennedy, the Vietnam war, the Civil rights movement led by later assassinated Martin Luther King, and the landing of America on the moon by Neil Armstrong. These changes are definitely demonstrated throughout the designs in the American 1960s kitchens. Maybe the kitchens changed so much because people couldn’t control what was happening around them so they decided to focus on what they could control, their kitchen. Or maybe people were just ready for a change. Whatever the case, 1960s kitchens expressed many different styles with lots of bright colors mixed with steel and an outdoorsy look.

Pictures below are from www.retrorenovation.com

This picture shows the bright colors that accentuated the sixties with the yellow and blue. Pay special attention to the backsplash and how the pattern matches the blue countertops. Also notice the wood top and bottom cabinetry which was very popular in the 1960s. 


This picture demonstrates a variety of elements that were popular in 1960s kitchens. First of all, notice the thick laminate countertops with the unique pattern which became popular in the early 1960s. Also, the laminate pattern on the cabinets was a popular decoration in the ‘60s.The steel mixed with laminate was popular in the ‘60s. Small tiling on the floor was a popular item in the ‘60s as well along with the brick walls around the windows.


This picture is a great example of the “outdoorsy” look that 1960s kitchens seemed to accentuate. A lot of 1960s kitchens were all about bringing the outdoors inside which is somewhat popular in today’s kitchens. This kitchen has two different patterns of brick, wooden cabinets, and beige colors. The grill in the kitchen was popular in the late ‘50s and early ‘60s.


This picture is from a 1966 kitchen. It is a great example of the laminate patterns that were so popular in the ‘60s. The wood cabinetry is also seen in this kitchen therefore combining the outdoorsy look and laminate look.


We also have a new blog on tumblr. Follow us on http://federalbrace.tumblr.com/.

Tuesday, June 5, 2012

Most Modern Kitchens

We thought it would be fun if we found websites with the most modern kitchen designs and introduced them to our fans. Some of the modern kitchen designs don’t look much different than kitchens that some of you might have. If you think your kitchen could fit the profile of a modern style kitchen or you have modern pieces or appliances in your kitchen then send us a picture of it and if we agree with you, then we’ll post it on our social media sites!

http://freshome.com/2010/06/11/25-modern-kitchen-designs-that-will-rock-your-cooking-world/

http://www.trendir.com/archives/001791.html

http://www.lifeofanarchitect.com/top-10-modern-kitchen-design-trends/

http://www.remodelingmyspace.com/kitchen/kitchen-designs-design-ideas/photos-modern-kitchen-design-pictures.htm

http://www.houzz.com/photos/modern/kitchen

http://dornob.com/modern-kitchen-design-inspiration-luxurious-layouts/

http://www.servicemagic.com/resources.dg.Kitchens.27.41.html

Wednesday, May 30, 2012

Kitchen Remodel Nightmare!

Recently we heard news about a retired couple who had an unexpected problem when trying to remodel their kitchen. They ended up having to pay for their countertops twice due to the negligence of another company! The video peaked our curiosity so we did some research on how to prevent kitchen remodeling problems from happening to you.

One way to prevent kitchen remodel problems is to hire a kitchen designer or visit your local kitchen design center. You might think that hiring a kitchen designer would be expensive, but it will be more cost effective in the long run. They are experienced and knowledgeable. They will plan a schedule for your kitchen remodel and stick with it, saving you time. They will save you money as well because they will be able to avoid the damages you might encounter on your own. Kitchen designers are skilled professionals and they know what types of questions to ask in regards to making your dream a reality. They might even give you ideas that you haven’t thought about before. They are also familiar with the certified suppliers and installers in your area.

Designers will help you avoid the problems you might sustain while looking for an installer yourself. We have referenced an article below that will explain what types of questions should be answered before the countertop installer is hired and if you’re remodeling yourself, how you can go about answering these questions. These questions include “Is the installer experienced, have you had a chance to see some of his work, is the installer easy to deal with, does the installer have the appropriate insurance and contractor’s license, will the job be finished in a timely manner, and are the labor and materials covered under warranty?”

Your neighborhood kitchen or home design center can help you choose the color of your countertops or cabinets. After they help you, they can give you a list of insured installers in your area. You can find installers in your phone book or internet directory as well. After you find an installer make sure to interview them even if you already have reviews from friends or family members. During the interview you can ask for referrals from previous clients that the installer has worked for. If you can talk to those clients/homeowners, you can ask them how the installer was to work with. If you don’t receive all positive feedback, you should consider the possibility of continuing the search for a different installer or further researching the feedback you receive.

http://www.countertop.com/articles/wiarticle.aspx?aid=7

Tuesday, May 29, 2012

Federal Brace Introduces The Durham

We have created an instructional video that demonstrates how to assemble our new Durham countertop corbel and shelf bracket. The Durham mixes Artisan glass with stainless steel support for your countertop or shelving needs. Check out this video to learn how to assemble our new Durham bracket. Let us know what you think and how we can further assist you with your designing needs.


http://www.youtube.com/watch?v=Uwv6Oyj2J6o&feature=youtu.be

Sunday, May 13, 2012

How to support your Laundry Room Countertop.

Ever wanted to set your folded clothes on a shelf out of the way of the pile of clothes resting on top of your dryer? It gets difficult when you’re pulling wet clothes out of the washer. Looking for a place to set your detergents, bleaches, and stain-removers? You may need a countertop or shelf in your laundry room.

If you decide to take the road to organization your countertop shelving will need support. If it doesn’t have solid supports it will lack stability and strength which can lead to a countertop loosening and falling – dangerous to those around your washer / dryer unit – children, small animals and you personally.

Federal Brace makes shelf brackets that are capable of holding a countertop in a laundry room. I am going to tell you how easy it is to install.


Things You’ll Need:
* Shelf Brackets from Federal Brace
* Stud Finder
* Construction adhesive
* Power Drill
* ¼” Screws
* Power Screwdriver
* A Level
* Pencil

You’re going to have to use a stud finder to find wall-studs along the entire length of the countertop. Mark the wall stud locations with a pencil.

Take the first bracket. Position it against the wall on the first stud mark. Figure out how high you want the shelf to go. Once you have reached your desired height you can make another mark.

Take a ¼” screw and a power screwdriver and place the bracket back where you want it to go. Drill through the bracket holes into the wall with your ¼” screw. Once it is secure you can move on to the second bracket.

Take your second bracket and move to the second stud mark. Move the bracket to the same height as the first bracket and use a level to make sure that the countertop is straight. Once you have a solid position mark where the bracket will go.

Take a ¼” screw and a power screwdriver and place the bracket back where you want it to go. Drill through the bracket holes into the wall with your ¼” screw.

Now you have your two brackets up. Time to put up your shelf. You should put construction adhesive on top of the brackets. Be careful not to put too much material on because it will leak over the edges. After it sets for a few seconds, you should be ready to apply your shelf. After the shelf dries for a bit it should be ready for use.

By the way, the number of shelf brackets is determined on the length of shelf you will be using. If you are using a gusseted shelf bracket (or bracket with a cross brace between the supporting flanges) then Federal Brace suggests using a bracket at no more than 24” spans. Check out our helpful video section covering the subject (CLICK HERE)

Please make sure to check out the shelf brackets at FEDERAL BRACE. Thank you and have a great rest of your week!